Dairy Farmers often pasteurize goat milk to kill any harmful organisms within it. By doing so, they also extend the milk’s shelf life. So, How do they pasteurize their milk, though?
Goat milk is pasteurized by heating it to a high temperature for a certain amount of time and then instantly cooling it. The specific temperature and amount of time vary depending on the pasteurization method.
Common Pasteurization Methods Used in Dairy Farms
There are five main ways to pasteurize milk:
1. The Vat Pasteurization Method
The first pasteurization method is vat pasteurization, also known as batch pasteurization. This was the original method developed after Louis Pasteur invented pasteurization in 1862.
Vat pasteurization is most used for milk by-products such as:
Components of A Vat Pasteurizer
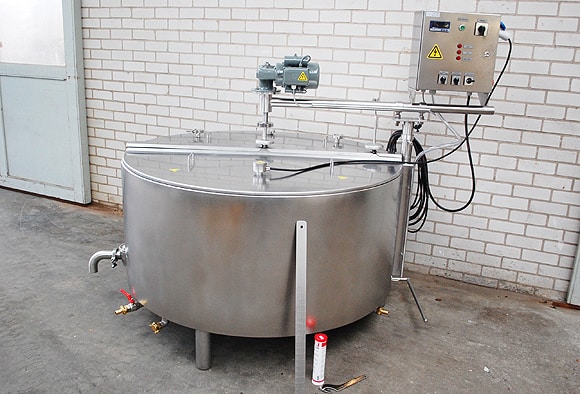
A vat pasteurizer is composed of a large stainless steel jacketed vat. Essentially, it is a tank with a jacket or hollow layer between the sides of the inner tank and the outside of the tank.
Attached to the jacketed vat are pipes that bring water in and out of the jacket portion and pipes that transfer the milk in and out of the tank.
Inside the tank is an electrical stirring device that agitates the milk for even heating.
Three types of thermometers keep track of the temperature of the milk throughout the process and the temperature of the air above the milk. These include the:

List of Steps Steps for Vat Pasteurization
Adding Milk to The Vat
The first step in this pasteurization process is for the milk to be added to the vat via the inlet line. The inlet line is positioned in a way that allows the milk to flow down the side of the vat instead of free-falling in. This prevents any foam from developing.
During this process, you want to ensure that the outlet valve is in a closed position so that the milk stays within the vat.
Once the milk is added to the vat, the inlet valve is closed to prevent any potential contamination by unpasteurized milk during or after the process has been completed.
Adding Heat
After the milk is in the vat, you need to ensure the cover is in place before beginning the process. Once the cover is down, steam or hot water is added to the vat jacket via pipes to begin heating the milk.
As the milk heats up, the electrical stirring device mixes the milk to make sure it is evenly heated.
The stirrer helps to push the milk down, forcing it to push against the sides and bottom of the tank where the heat is.
The Holding Period
Milk is heated to 145 degrees Fahrenheit for 30 minutes. The temperature and time are recorded on a recording thermometer chart at least every ten minutes to ensure everything is going smoothly.
The temperature should be raised to 155 degrees Fahrenheit for the 30-minute holding period if the milk:
Cooling the Milk
Some vats allow the milk to stay in the vat to cool. However, most have the outlet valve open, which helps the milk to flow into a pipe or other holding area where a cooling medium can be used.
Different cooling mediums include:
2. High-Temperature Short Time (HTST) Pasteurization Method
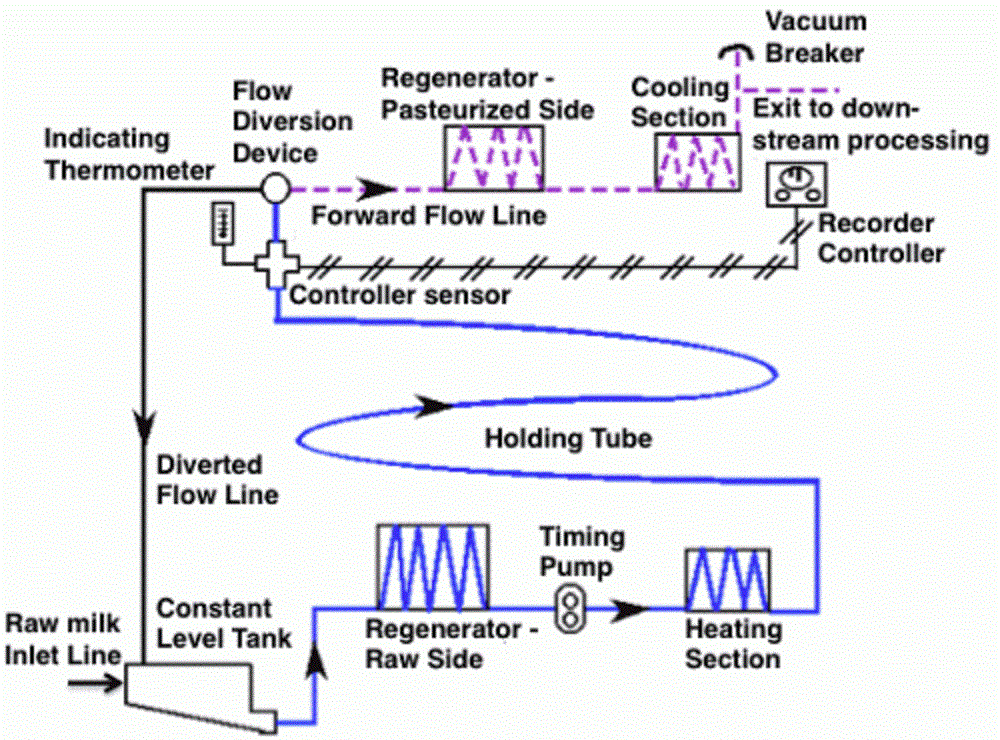
The High-Temperature Short Time Pasteurization (HTST) method is the most used process today. It utilizes a continuous process that allows milk to flow through tubes that pass through heated plates consistently. This saves farmers time and energy.
Components of A HTST Pasteurization
The HTST system is composed mostly of tubes and stainless-steel plates.
A timing pump pressurizes the milk to ensure it goes through the system at the correct pace for proper pasteurization.
There are tanks at the beginning and end of the system to store the raw and pasteurized milk.

Source: University of Guelph
List of Steps For HTST Pasteurization
Passing the Milk Through Regenerator Section
Raw milk is stored in a balance tank at 39.2 degrees Fahrenheit. This tank utilizes a float valve assembly to make sure the level of the milk within the tank is consistent.
The milk levels need to be the same at all times to ensure the pressure of the milk leaving the tank is uniform.
As the milk leaves the tank, it enters a section of thin stainless-steel plates that heat it between 134 degrees Fahrenheit to 154 degrees Fahrenheit. This is known as pre-heating. It helps the milk get closer to the desired temperature before going through the heating section.
The raw milk is heated by the pasteurized milk that has just finished the heating process and is on its way to cool down. The thin stainless-steel plates allow the pasteurized milk to transfer its heat to the raw milk as they flow in opposite directions on either side of the plates.
This section of stainless-steel plates is known as the regenerator section.
Heating the Milk
Once the milk has passed through the regenerator section, it reaches a timing pump that pressurizes it to ensure it goes through the heating section for the correct amount of time.
The heating section is composed of thin stainless-steel plates with hot water flowing on the other sides. This heats the milk to 161 degrees Fahrenheit.
The milk then flows through a holding tube for at least 15 seconds, maintaining the correct pasteurization temperature.
If the milk is condensed, sweetened, or has a fat concentration, it needs to reach a temperature of 180 degrees Fahrenheit for 15 seconds.
Passing the Milk Through Flow Diversion
The milk flows through an indicator thermometer and a recording controller at the end of the holding tube to ensure it has reached the correct temperature for the right amount of time.
It then passes through a flow diversion device that allows it to continue through the rest of the system or sends it back to the raw milk holding tank. The device will send any milk back to the balance tank that does not reach the correct temperature for the right amount of time.
Passing the Milk Through the Regenerator Section Again
If the milk has been allowed to pass through, it goes back into the regenerator section to heat the incoming raw milk.
During this process, the pasteurized milk will cool down to between 48 to 89 degrees Fahrenheit.
Cooling the Milk, Holding and Packaging
Next, the milk flows through another set of stainless-steel plates with coolants on the other side. Here it is cooled to 39.2 degrees Fahrenheit.
After it is cooled, it passes through a vacuum breaker into a tank for holding before packaging.
3. Higher-Heat Shorter Time (HHST) Pasteurization Method
The Higher-Heat Shorter Time (HHST) pasteurization method uses the same steps as the HTST method. However, the heating process can differ slightly.
When using the HHST method, you can choose between direct or indirect heating.
Indirect Heating
The indirect heating method is the same method used for HTST. It involves using a heating medium that does not come in direct contact with the milk. This can be accomplished by using:
Direct Heating
Direct heating involves injecting steam straight into the milk. You need to ensure that the steam injector is designed to condense the steam completely. This will prevent temperature variations within the holding tube that could result in milk not being correctly processed.
Use a deaerator on the boiler that creates the steam to get rid of non-condensable gasses.
Heating Times and Temperatures
For the HHST method, there are multiple temperatures and time requirements that dairy farmers can follow:
Temperature | Holding Time in Seconds |
|---|---|
191º F | 1.0 |
194º F | 0.5 |
201º F | 0.1 |
204º F | 0.05 |
212º F | 0.01 |
Temperature Vs Holding Time (Sec)
4. Ultra-Pasteurization Method
The Ultra Pasteurization (UP) method creates a milk product with a longer shelf life of about 30 to 90 days. This shelf life only holds if the milk is properly refrigerated and unopened. Once the milk is opened, it is only good for about ten days.
This process uses the same continuous system as the HHST method, except the milk is heated to 280 degrees Fahrenheit for 2 seconds.
The other main difference between UP and HHST is that UP uses commercially sterile equipment that is tightly sealed.
This helps to protect the pasteurized milk from contamination during the process better than HHST does.
5. Ultra-High Temperature (UHT) Method
Aseptic processing, also known as Ultra High Temperature (UHT), is very similar to the UP method. It requires the milk to be heated to 280 degrees Fahrenheit for 2 seconds, just like UP does.
However, this method differs in the final packaging stage. The milk is pasteurized in commercially sterile equipment in this process and then poured into hermetically sealed packaging under aseptic conditions.
This means that the pasteurized milk is poured into completely airtight packaging to prevent any contamination.
Benefit And Drawback of UHT
Benefits of UHT
Drawback of uht
What Is UHT Processed Milk Packaged In?
In order to be hermetically sealed, milk is placed into either:
- A sterile five-layered laminated “box.”
or - A metal can
check out
Our Buyers Guides
Our top picks for your Dairy Farming Needs
How to Pasteurize Milk at Home?
Some goat farmers with small herds will pasteurize their milk at home to make it safer for them and their goat’s offspring to consume.
Milk that is pasteurized at home is not allowed to be used commercially but is fine for personal consumption.
There are four main methods for pasteurizing milk at home. All these processes fall under the vat pasteurization method.
Which Method Is Best for Milk Pasteurization at Home?
A home pasteurizer is an easiest and most effective way to pasteurize at home, although it can be quite expensive.
Many farmers opt to heat their milk on their stovetop until it reaches 165 degrees Fahrenheit for 15 seconds. They then transfer it to a homemade ice bath until it cools down to 55 degrees Fahrenheit.
The least effective method is to put the milk in the microwave. A microwave will not evenly heat your milk and does not allow you to measure the temperature continuously.
Key Points to Remember
If you plan to pasteurize your milk at home, there are a few important points to follow for the best results.
#1
Make sure your milking environment is clean
#2
Make sure the milk has been chilled as soon as possible after milking. Chilling the milk as soon as possible after milking will help to prevent bacteria growth and spoilage.
#3
Strain the milk before pasteurizing to remove anything floating in it. You can use a specially made milk strainer or a kitchen strainer with a cheesecloth in it to do this.
#4
Keep the milk out of direct sunlight and fluorescent lights
Pasteurizing Your Milk Is Important
Goat’s milk can contain bad bacteria that can negatively affect you or the goat’s offspring if not removed. Luckily, there are multiple different ways to pasteurize your goat’s milk safely.
Whether you are looking to pasteurize your milk in a batch or a continuous system, maintaining the correct temperature for the right amount of time is the key to your success.
You should always be aware of your taste preferences and shelf-life needs when choosing the method that will work best for your dairy farm.
Check out these pasteurizers suitable for small to medium-sized dairy farms and even for pasteurization milk at home.
Sources:
